Tuesday, 12 May 2009

SVA day


Last night I worked till 10.30 on the kit trying to get it finished for the big day...


And this is how it looked at 06.30


Exhaust Bracket


I then fitted the exhaust bracket.

Mirrors


With the seats in you can then fit the mirrors.

Nose and Bonnet


Next was to fit the nose, and trim the bonnet and fit.

Trimming the kit


The fun part was trimming the carpet and fitting it....

I glued the carpet in with contact adhesive (don't do this in the garage)

When the carpet is in the seats and harnesses were fitted.


Filler cap


Fit the fuel cap to the body.
I fitted mine this way as I didn't want problems filling the tank (common fault with this kind of setup is the bend in the pipe wont let you fill it quickly without splash back)

Fuel pump


Next was to fit the fuel pump so i could start it!
With a few false starts it went.

Friday, 10 April 2009

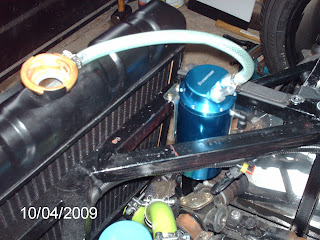
Expansion tank


Well this was to be a oil breather kit but I liked it so much I'm going to have to get two...
So with a modification of fitting a tube into it to reach the bottom then fitted it as a "spit and suck" bottle.

SVA looming


This is how it looks as of the 9/4/09 and I have just been given a date for the SVA. The 28/4/09.... That's just 19 days away..
Things I still need to do is....
Finish fitting the fuel setup.
Trim the car.
Map the ECU.
Fit the seats and harnesses.
Fit the dash.
And several other things to do
I BETTER PULL MY FINGER OUT!!!

Fuel cap


After reading a post I decided to make mine a vented one, as I didn't want to drill more holes in the tank.


I dismantled it and found the best place to drill a hole in the body of the cap.


This is the part to be drilled in, if you look inside there are two slots (drill through one of them)
Then put it back together and it will vent through the lock.

Front wings


Next was the front wings, I trimmed and fitted them.
After that was the front indicators, the wiring was put through the wing bars.


Horn


Next I fitted the horn and tried it!! ( then wish I had'nt )

Horn button boss plate


This is a plate I made to fit in the boss to stop the wiring getting trapped as you turn the wheel.
The black bit is a small hole to put a wire through then fit the plate to the column, the wire is then wound loosely in the gap between the plate and the boss.
As the steering is turned the coil is tightend or slackend.

Air Filter


With the Jenveys fitted the backplate and filter was fitted.

Pipes


With the rad fitted I then did the pipework (what a nightmare!)


I don't think I did a bad job though....

Need to keep it cool


The radiator was placed inside the nose and measured on fit.
The nose was then taken off and the rad was fitted.

Nose ( I thought I was building a car... Not a frog )


Next was to trim and fit the nose cone.
Take your time with this as it will show if you don't...

Rear Lights


With the rear wing on it's time to fit the lights.


Keep the underside neat and tidy and it looks good.

Tuesday, 3 March 2009

Rear wings


My next challenge was to fit the rear wings.


So I marked and drilled the holes.


I then marked out the holes on the body then drilled and then fitted the wing.


Does'nt it look good!

Fuel pressure regulator


With the Jenveys fitted I fitted the fuel regulator.
I don't know if it will stay there yet, I might need move it.

Jenveys


I got the Jenveys today and made a start on fitting them.


The pipes just to the left of the engine are the fuel lines (if you stop them there they just need fuel hose to fit to the Jenveys).


This was a fun bit to do....

Fitted the Jenveys and the fuel lines to them.

Oil pressure sender


The next job I did was to fit the oil pressure sender and sort out some of the wiring.

Alternator


As the space on the proper side of the engine is tight the only other option was to place the alternator on this side.
So Myself and a fellow builder made up a plate to attach to.
Happy birthday to me... :o)

Making light of things


With the rear panel fitted I then fitted some of the rear lights.

Dashing


Over the past couple of weeks I made the dash and wired it up.

Rear Panel


Next was the rear panel (loads of fun!)
Take a lot of care on this as It takes a fair bit of time to get right, and the part from the top of the rear to the side panel really is a nightmare to do.

Boot boxing


With the tank in place I had a go at fitting some panels in the boot.

I bought some sheet aluminium, made a template and this is the result.

Both shock turrets plated with access holes for removal of the bolts later (Should the shock need replacing).


Fuel tank


The next job I done was to fit the fuel tank.

Engine mount part 2


This is the lug that needs to be removed.


And now with it removed.


As you can see with the lug removed the mount bolts closer to the engine.

Saturday, 24 January 2009

Engine mount


With the engine mount inplace you can see there is too much of a gap between the mount and block.


So after chatting to a fellow builder we decided to cut the fowling peice off.


Will have new pics of this when complete.

Remote oil filter


With the space between the engine and the steering shaft too small I fitted the remote oil filter kit.


More wiring


With the relays rewired I then fitted them.


The next task was the fuse box, witch I made a square hole to just poke the fuse box through.

Now does'nt that look better...

Boot


With the boot put together and test fitted to the kit I drilled the holes for the rollbar to boot stays.

Battery


The next thing I did was to fit the battery.

Washer bottle


As I don't want to get through the SVA then fit the screen, demister and wipers, I fitted the washer bottle.